Refit: Pangkor Marina & Boatyard, Lumut, Malaysia - October 2016 to January 2018
We didn't really spend the entire 15 months (October 2016 to January 2018) working on Slip Away, although sometimes it felt like it. When we hauled out at Pangkor Boatyard, we had one big job on our "to-do" list - painting the cabintops and decks. We had only a few other smaller maintenance/repair jobs on our list, but as always happens, that list grew. We expected to be out sailing again by January 2017 (not 2018!), but things didn't go quite the way we planned. The weather was rainy, the painting project was delayed, other maintenance/repair items took longer than anticipated - so what else is new?! Add in an unplanned trip back to the U.S. for crew maintenance, and we ended up a year behind schedule.
We had Slip Away hauled out at Pangkor Boatyard in late April 2016 and left her there while we traveled back to the USA for the summer, returning in early October. We always want to be present to supervise any boat work, so no work was done while we were in the USA. Work started when we returned in October, although it was a bit of a slow start because we took a couple weeks off to go on a scuba diving trip. But by early November, we were ready to forge ahead. While Slip Away was having her facelift, we moved into a nearby studio apartment and rented a car, both of which were very affordable. The apartment made life "on the hard" not just tolerable but quite comfortable, and it also served as a workshop, where we serviced deck hardware, painted, varnished and sewed.
Pangkor Boatyard was an economical place to do boat work, but they do not have a lot of highly skilled boat workers, so we needed to be fairly self-sufficient here. Although we are pretty capable, we are not always efficient, and in the heat and humidity of Southeast Asia, our productivity levels were not particularly high. Nevertheless, the important maintenance/repair items were completed, as well as some jobs that weren't essential to Slip Away's operation but made her look good. When Slip Away left Pangkor Marina, she was ready to tackle the Indian Ocean.
Below is a summary of the jobs completed.
Painting Decks and Cabintops
Jimmy of Prestige Marine, a boat painter based at the Pangkor Boatyard, enjoys a good reputation, and we engaged him to paint Slip Away's decks and cabintops. Our decks and cabintops were last painted in Cartagena, Colombia, in late 2009, and regrettably, we used a local marine paint for that job, and it just didn't hold up. This time, we planned to use Awlgrip® paint, which is a high-quality marine paint, and Jimmy is a dealer for that product. In addition to painting the decks and cabintops, Jimmy's crew would also resurface them. Slip Away's decks and cabintops came out of the factory with a molded-in non-skid, and applying additional paint to the molded-in non-skid would likely cause it to lose its grip. So, the plan was to sand them down smooth and apply a non-skid painted surface.
Before Jimmy's crew could get started on preparing the decks and cabintops, the two of us removed all deck hardware - handrails, stanchions, anchor windlass, winches, clutches, cleats, etc. All fasteners were bagged and labeled, and we used almost 100 zip-lock bags. Once that was completed, Jimmy's crew sanded down the non-skid surfaces, applied a high-build primer on those areas, then sanded and applied an epoxy primer to all areas, then sanded some more, and finally painted. Work started in October, but the prep work (sanding, filling, priming) took a long time. The weather was uncooperative (lots of rain) and the boat was not painted until January. The paint job didn't go perfectly, and Jimmy very willingly came back to fix the areas we weren't happy with - runs on some of the vertical surfaces and a couple areas of thin paint - but that required more sanding and painting, and took more time. The paint job finally wrapped up in February, and we could set about reinstalling all the hardware that we removed previously. Reinstalling deck hardware takes some time - dry fitting, masking, applying sealant and then installing - at least two to three times as long as it took to remove it.
Removing deck hardware
Painting
Reinstalling deck hardwareAs mentioned previously, painting the boat was our big job on this haul out, but there were a number of other smaller but important projects:
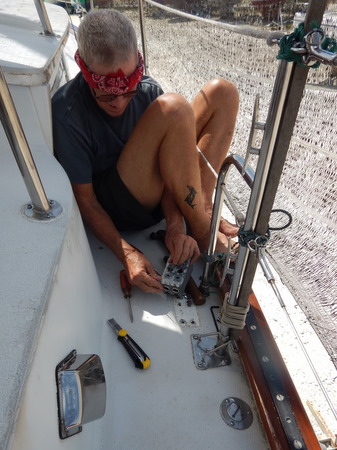
- Designed and had fabricated a new stainless plate, which is installed on our main mast and organizes several of our running rigging lines. One of the eyes on our old plate broke (the boom vang attachment) and could not be welded in place. After removing the old plate, Rich decided to design a bigger and stronger plate. We had the new plate fabricated at the Leong Cheong Foundry in Lumut, and Rich riveted it to the mast.
- Designed and had fabricated support plates for the steel cross beam which supports our main mast compression post. Rich had seen some rust seeping out of the fiberglass which encased the existing cross beam, and that concerned him. He consulted with our friend Andy (s.v. Spruce) who has an engineering background, and they determined a course of action. Rich chipped away the fiberglass on the cross beam with an electric multi-tool, then designed two additional heavy duty plates (front and back), which Leong Cheong Foundry fabricated for us. Joe of Joe's Yacht Services (one of the Pangkor vendors) helped us epoxy the new plates in place and also loaned Rich a heavy-duty drill to secure the plates with thru bolts.
- Joe of Joe's Yacht Services also built us a new fiberglass cover for our dive compressor. (The old one was built from wood in Ensenada, Mexico, in 2003 and had some dry rot.)
- Replaced a couple of broken teak bow sprit slats. We were able to buy reasonably priced teak at the Sim Lee Sawmill in Lumut.
- Had all the deck cleats powder coated.
- Greased and serviced all 10 winches.
- Cleaned and serviced all rope clutches.
- Cleaned all deck hardware fasteners.
- Stripped, sanded and revarnished the cabintop handrails and trim. Since the handrails and trim were removed for painting, we stripped off the old varnish (using a heat gun) in the apartment, sanded them back at the boatyard, and then applied a couple of initial coats of varnish back in the apartment. Final coats of varnish were applied after the handrails and trim were reinstalled.
- Applied maintenance coats of varnish to the teak caprail. We did this after the decks were painted but before reinstalling the stanchions on the deck, which made the job significantly easier.
- Painted metal tops and bases on our salon mini-blinds. The plastic mini-blinds were still in good shape, but the metal tops and bases on the others were showing some rust. A little bit of paint and they look brand new again.
- Installed new hinges on all interior cabinets.
- Sanded and re-varnished various interior areas that were showing signs of wear (galley, all interior handrails, and a few other spots).
- Purchased a new Lalizas life raft from Keisha Marine in Port Klang when our Avon life raft failed inspection.
- Replaced our radar/chartplotter screen, as well as the control unit/screen for our autopilot. The radar/chartplotter screen started degrading a couple of years ago (separation of the LCD and screen bonding), and the autopilot control unit screen appeared to be suffering from a similar issue. Since our electronics were purchased and installed new in 2003, they were considered obsolete and the manufacturers would not repair them. Fortunately, we found a couple of "gently" used replacements on Ebay.
- Purchased and installed a new higher-quality GPS antenna for our AIS transceiver.
- Wired the old AIS GPS antenna to our VHF radio, so that it now displays our position, and we were also then able to input our MMSI number into the VHF, which helps in identifying our vessel in an emergency situation.
- Installed two new Morad VHF antennas (purchased and brought back from the USA). The antenna installed at the top of our main mast is tuned for the VHF radio (our old one died as we were leaving Australia). The antenna on our mizzen mast is specifically tuned for our AIS transponder, and we've seen a significant improvement in reception of AIS signals.
- Replaced the start battery (one Trojan 30XHS, 12-volt, deep-cycle wet cell) and the house bank of batteries (six Trojan T-105, 6-volt, deep-cycle, wet cells).
- Repaired installation of a cabinet in the v-berth, which was poorly done when the boat was built. Rubel, one of the general boat workers at Pangkor Boatyard helped us with this project, as well as a few other small items, and we were pleased with his work.
- Patched a leak in the dinghy.
- Completed the cockpit drain installation. We'd been sailing for years with this job 75% done, but it wasn't a large concern since we rarely get sea water in our cockpit. But, given reports of rough seas in the Indian Ocean, we thought it would be prudent to make sure all the final drain was connected.
- Installed an additional bilge pump.
- Painted the bottom. Jimmy's crew sanded the bottom and applied two more coats of Jotun Seaforce 90 bottom paint, which we still feel is the best bottom paint we've ever used.
- Polished the hull (with the help of one of Jimmy's crew)
- Resealed the stainless ring in our cockpit floor (secures the cut-out through which the generator and engine were installed in the boat).
- Purchased a new mizzen and headsail from Zoom Sails in Langkawi, Malaysia. They are beautiful and high-quality sails made from Dimension Polyant C-Breeze Dacron.
- Had our mainsail and staysail inspected by Au Wei (aka Mr. Teh) at Sails Loft Malaysia, and he did some minor repairs on the staysail.
- Reinstalled all running rigging - halyards, preventers, sheets, furling lines. In an effort to preserve our halyards from UV degredation, before leaving the boat in the summer of 2016, we removed all the running rigging and ran messenger lines in their places. In theory, this was a great idea, but some of the messenger lines degraded in the UV. In order to reinstall our main halyard, Rich climbed to the top of the mast, attached a fishing weight to a messenger line, dropped it down the mast, and Jan fished it out through an opening on the side of the mast. It worked!
- Installed new vents for the fuel and water tanks
- Installed a new cockpit shower.
- Inspected and rebedded all chainplates.
- Had two new zippers installed in the canvas cockpit enclosure, as well as a couple other repairs.
- Made and Installed a couple of additional door stoppers for interior cabinet doors that sometimes open during rough seas.
- Installed new antenna wire for the SSB/Ham radio.
- Repaired broken gas tank bracket in the dinghy.
- As part of the painting project, all of the salon and aft cabin windows were removed and resealed and we also applied some "Creeping Crack Cure" between the window and the frame to stop any leaks there.
- Replaced a few older circuit breakers and moved a couple of breakers on the panel to more logical locations.
- Replaced headsail and staysail halyards.
- Sewed new cockpit cushion covers.
- Sewed new stateroom curtains
- Sewed new "day covers" for our settee cushions. We generally keep covers made from bed sheets on our settee cushions to protect the cushions from sweat and body oil in the tropics.
- Replaced the Beckson opening ports at the head and foot of our berth.
When we finally left Pangkor Boatyard & Marina in January 2018, we traveled north to Thailand for a shake-down cruise and then returned to Malaysia where we continued with more maintenance and repair before heading out for our crossing of the Indian Ocean. The major projects completed during this time were:
- Inspection of our standing rigging by Jai Oztoprak in Phuket/Krabi (Thailand). He found a couple of areas needing attention - a fitting at the top of the mizzen roller furler that needed to be repaired and a couple of cracked shroud fittings that needed to be replaced. He did those repairs for us and also tuned our rig.
- Northern Lights generator rebuild by Mr. Choo and his team at Supreme Power Engineering. Parts supplied by Hatton Marine in Seattle.
A few more photos:
Servicing winches in the air-conditioned comfort of
our studio apartment
Installing the new main mast support plate
Powder-coated cleats - very nice!
Touching up the interior varnish
Installing the new deckplate, which organizes a number
of our running rigging lines
Beautiful new mizzen sail from Zoom Sails
.JPG)
.JPG)
.JPG)
.JPG)
.JPG)
.JPG)
.JPG)
.JPG)